Mastering the "I'm a Multitasker" SVG: A Guide to Flawless Crafting Results
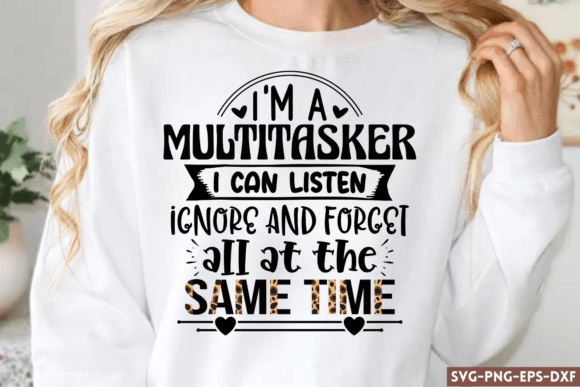
We have all been there. You are in the middle of a conversation, nodding along, planning your dinner, and mentally drafting an email, all while someone explains a complex concept to you. The phrase "I'm a multitasker I can listen ignore and forget all at the same time" has become a modern mantra for anyone juggling the demands of work, family, and personal life. It is humorous, relatable, and perfect for a statement piece. However, turning this witty sentiment into a professional-quality physical product requires more than just hitting "download." Whether you are a seasoned small business owner selling custom tees or a hobbyist making gifts for friends, the difference between a project that looks amateurish and one that sells itself often lies in the details of file selection and application.
This specific SVG design is incredibly versatile. Its clean lines and text-based layout make it ideal for vinyl decals on laptops, heat transfer vinyl (HTV) for t-shirts, or even sublimation on mugs. Yet, many crafters rush through the preparation phase, leading to frustrating results like weeded vinyl tearing, pixelated prints, or designs that simply do not fit their intended surface. To ensure your final product honors the sharp wit of the quote with equally sharp execution, it is essential to understand the common pitfalls associated with digital cutting files and how to avoid them.
Understanding File Formats and Compatibility
One of the most frequent misunderstandings occurs right at the download stage. When you purchase a premium bundle containing SVG, PNG, EPS, and DXF files, it is tempting to grab the first one you see. However, using the wrong format for your specific machine can compromise the quality of your cut. For users of Cricut Design Space or Silhouette Studio, the SVG file is almost always the superior choice. Unlike raster images like JPEGs or standard PNGs, an SVG is a vector file. This means the design is defined by mathematical paths rather than pixels, allowing it to be scaled up or down infinitely without losing resolution.
A common mistake is attempting to use the included 300 DPI PNG for cutting purposes. While a high-resolution PNG is excellent for sublimation printing or direct-to-garment printing, using it as a cut file forces the software to trace the edges of the image. This often results in jagged cuts, excessive nodes, and a messy finish that requires tedious cleanup. If you are working with a scanner cutter like the Brother ScanNCut, you might need the DXF version, but even then, verifying that the layers are separated correctly is crucial. Always inspect your design in the software before sending it to the mat. Ensure that the text "listen," "ignore," and "forget" are grouped logically if you intend to cut them as a single piece, or ungrouped if you plan to use multiple colors of vinyl.
The Trap of Ignoring Material Settings
Even with the perfect file, the physical application can go awry if material settings are overlooked. The humor in this design relies on readability; if the letters are too close together or the weeding process damages the thin connections in the font, the message gets lost. A frequent error among beginners is treating all vinyl the same. Permanent adhesive vinyl behaves differently than heat transfer vinyl (HTV), and both react differently to blade depth and pressure.
For instance, when applying this design to a t-shirt using HTV, failing to mirror the image before cutting is a catastrophic but easily avoidable error. Since the design contains text, cutting it without mirroring will result in a backward message once pressed onto the fabric. Furthermore, the "forget" portion of the quote might feature thinner strokes depending on the font weight used in the specific design variation. If your blade pressure is too high, you risk cutting through the carrier sheet, making weeding impossible. Conversely, too little pressure leaves parts of the design uncut, forcing you to re-cut and waste material. The best approach is to perform a small test cut on a scrap piece of your actual material. Adjust your settings until the cut is clean but does not pierce the backing.
Design Placement and Visual Balance
Another area where projects often fall short is visual composition. Just because a file is "high quality" does not mean it will look good on every surface. Placing a wide, horizontal text design like this on a narrow tumbler or a small coffee mug can lead to cramped lettering that is difficult to read. Before committing to the cut, utilize the preview mode in your design software to simulate the size and placement on your mockup.
Consider the negative space. The phrase plays on the idea of mental clutter, so the design itself should feel open and breathable. If you shrink the design too much to fit a small sticker, the spaces inside letters like "a," "e," or "o" may fill in with vinyl during the weeding process, ruining the legibility. A better approach for smaller items is to stack the text or break the phrase into two lines, provided the SVG file allows for easy manipulation. Most premium files come with grouped elements that can be ungrouped and rearranged. Take advantage of this flexibility to create a layout that suits your specific canvas rather than forcing a standard layout onto an unsuitable object.
Commercial Use and Licensing Clarity
For entrepreneurs and small business owners, understanding the licensing terms is non-negotiable. Many crafters assume that purchasing a digital file grants them unlimited rights to sell products featuring that design. While this specific file is noted as great for small business use, it is vital to read the specific license agreement included with your download. Some creators allow unlimited physical sales but prohibit selling the digital file itself or using the design on Print-on-Demand (POD) services where the customer uploads the art directly.
Violating these terms can lead to account bans on marketplaces or legal issues. To stay safe, keep a record of your purchase and the license terms. If you plan to scale your business, ensure that the "personal and small business use" clause covers your projected volume. If you are unsure, reaching out to the designer for clarification is always the professional route. This diligence protects your brand reputation and ensures you can continue creating without interruption.
Final Checks for Professional Results
Before you press "make," take a moment to review your workspace and tools. Is your cutting mat clean and sticky enough to hold the material? Is your blade sharp? Dull blades are a silent killer of detail, often dragging vinyl instead of slicing it cleanly. Additionally, when weeding this specific design, pay close attention to the connectors between words if they are joined, or the delicate tails of the letters. Using a magnifying lamp can help prevent accidental tears.
Ultimately, the goal is to create a product that makes people smile and nod in recognition. The quote "I'm a multitasker I can listen ignore and forget all at the same time" resonates because it speaks to a shared human experience. Your crafting should reflect that clarity. By choosing the correct file format, respecting material limitations, planning your layout carefully, and adhering to licensing guidelines, you transform a simple digital download into a high-value item. Whether it ends up on a tote bag for a busy mom, a decal for a freelancer's laptop, or a shirt for a teacher, the quality of your execution will ensure the message is received loud and clear—without any forgetting involved.